
Deep Learning Dude pt 1
Want to share your content on R-bloggers? click here if you have a blog, or here if you don't.
You’ve probably noticed that Deep Learning is all the rage right now. AlphaGo has beaten the world champion at Go, you can google cat photos and be sure you won’t accidentally get photos of canines, and many other near-miraculous feats: all enabled by Deep Learning with neural nets. (I am thinking of coining the phrase “laminar learning” to add some panache to old-school non-deep learning.)
I do a lot of my work in R, and it turns out that not one but two R packages have recently been released that enable R users to use the famous Python-based deep learning package, Keras: keras and kerasR.
The first thing you’ll need to do is to make sure you have Python 3 on your system. Windows generally doesn’t have Python at all, while Macs and some Linux systems will include Python 2.7. The way I’d recommend to get Python 3 is to download and install Anaconda. (Few people do data science with a base-installed Python: they mostly use Anaconda, which pre-packages a lot of data science tools along with Python. Trying to install all of those tools yourself is … difficult.)
The usual place to install Anaconda is in your home directory. Then, on a Mac or Linux system add ~/anaconda/bin: to the beginning of your PATH environment variable. For example, on my system, I edited the .profile file in my home directory and the beginning of the PATH line looks like export PATH=~/anaconda/bin:/usr/local/bin:, so that when I type python the system will use the one provided by Anaconda.
One of the nice things about Anaconda is that it provides an enhanced package loading system, conda. This is similar to R’s cran in some sense. But to install Keras, we’ll use Python’s pip, which is similar to R’s devtools and is run from a command line (not from within Python):
pip install keras tensorflow pydot graphviz
should do the trick. The last two packages allow you to plot the model, though the plot is fairly boring.
Of the two packages (keras and kerasR), I’ve started using kerasR because it has some nice tutorials and it’s in CRAN, so that’s what I’ll use here. (keras is installed via devtools.)
In R, install packages kerasR and reticulate from CRAN. To load kerasR requires an extra step beyond the usual library:
reticulate::use_python ("~/anaconda/bin/python")

library (kerasR)
The use_python tells R where to find the Python 3 that you’re using, the one where you also pip-loaded keras. If the library doesn’t think for a moment and then return “successfully loaded keras”, something is wrong, and you’ll get a bunch of Python error messages which will give you a clue, if you examine them carefully. If you forget the use_python, R will be looking at the base-installed Python and won’t be able to import keras in Python. The things that can go wrong are myriad, and I can’t really be more specific, unfortunately.
If you got this far, you can now follow the kerasR tutorial. At the moment (03 June), there is an error in the first model of the tutorial (Boston Housing) that causes it to perform poorly. I’ve submitted a trouble ticket, and the code I’d recommend is:
mod <- Sequential ()
mod$add (Dense (units=50, input_shape=13))

mod$add (Activation ("relu"))
mod$add (Dense (units=1))

# mod$add (Activation ("relu"))
keras_compile (mod,  loss="mse", optimizer=RMSprop())
boston  <- load_boston_housing ()

X_train <- scale (boston$X_train)

Y_train <- boston$Y_train

X_test  <- scale (boston$X_test, center=attr (X_train, "scaled:center"), scale=attr (X_train, "scaled:scale"))

Y_test  <- boston$Y_test
keras_fit (mod, X_train, Y_train, batch_size=32, epochs=200, verbose=1, validation_split=0.1)
pred <- keras_predict (mod, X_test)

sd (as.numeric (pred) - Y_test) / sd (Y_test)
plot (Y_test, pred)

abline (0, 1)
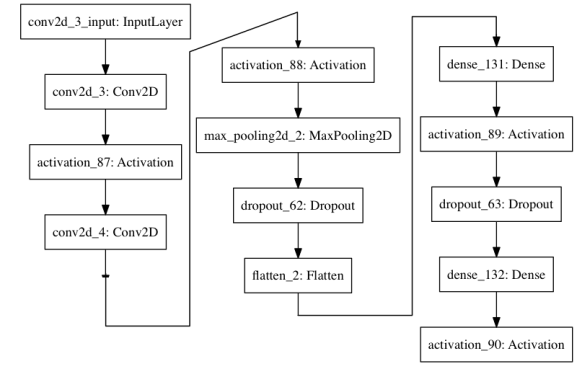
Keras works a bit differently than the way R usually works in that mod$add modifies the model mod directly, in-place. The mod$add‘s first create an empty model (Sequential ()), and then add a layer with 50 hidden units and a “Relu” activation function, and then add the 1-unit output layer.
This is pretty much a simple Hello World model with 13 input variables and one hidden layer with 50 units. You could have made the same model in older R neural net packages, but Keras has many advantages.
In the tutorial (as of 03 June), the R scale‘s of the X training and testing data were independent and not linked. In this case, I scale the training data and then use the same center and scale for the testing data, just as you would when you deploy a model: training represents the data we already have, while testing represents new data arriving in the future. (This is a pet peeve on my part, and not generally important.)
More importantly, the tutorial also accidentally applied a second normalization to the data in the prediction step, which would drive it in a different direction from the training data. The version, above, has results that look pretty reasonable:
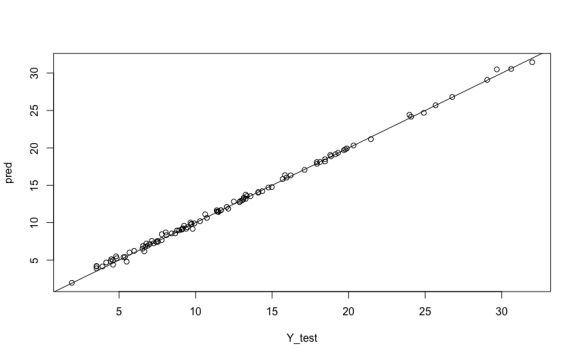
This example isn’t Deep Learning(tm) and you could’ve done this with older R neural net packages, but it’s just the start of Keras exploration. Follow the kerasR tutorials and the links they recommend. For more details on what the various kerasR functions do, check out the Keras pages. (Remembering that kerasR doesn’t implement everything in Keras itself.)
For a very readable explanation of Deep Learning architectures, first read Neural Network Zoo Prequel, and then Neural Network Zoo, by the Asimov Institute.
One of the advantages of Keras is that it’s built on Tensor Flow, which takes full advantage of clusters of machines, GPUs, and all those other things that makes Google Google. Unfortunately, by “GPU” we mean Nvidia GPUs (i.e. GPUs that support CUDA). My Mac laptop has an AMD graphics chip, so I can’t use GPUs, though I can still develop things on my laptop and then someday spin up things on Amazon Web Services and use GPU-based instances.
Filed under: Data Science, R, Rblog, Uncategorized

R-bloggers.com offers daily e-mail updates about R news and tutorials about learning R and many other topics. Click here if you're looking to post or find an R/data-science job.
Want to share your content on R-bloggers? click here if you have a blog, or here if you don't.