
Editing metadata in trail camera images using R, magick and exiftool
Want to share your content on R-bloggers? click here if you have a blog, or here if you don't.
I have a new hobby: camera traps, also known as trail cameras. Strapped to trees in my local bushland they sit in wait, firing automatically when triggered by a passing animal. Once in a while, something quite magical happens.
The camera model I chose is the Campark T85 which for me, had the right combination of features and price point. One useful feature is the ability to transfer images and video to a phone wirelessly (albeit through a rather clunky phone app). Unfortunately, images retrieved in this way have one major flaw: an almost-complete absence of metadata. There is no GPS in the camera of course, but the EXIF data does not include the date/time of the image, nor the camera make.
With a little research, I found a way to add this information to the images later using R and some additional software named exiftool. Here’s how I did it.
Set up a directory structure
First, I create a directory, ~/Documents/Campark85, containing files and directories that look like this: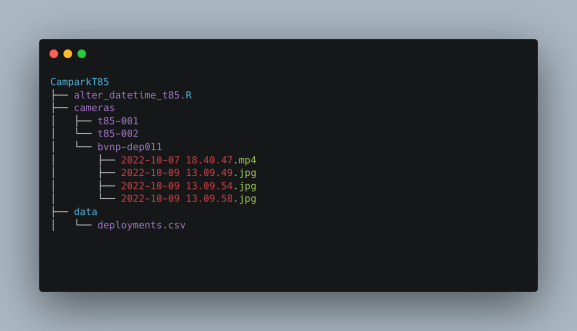
There’s an R script – more of that later, and a CSV file in the data directory – more of that later too. Under the cameras directory is a directory for each camera and in those directories, a directory for each deployment. A deployment basically describes the placement and location of the camera and has an ID, corresponding to the directory name.
Within each deployment directory are the image and video files retrieved from the camera.
Create a deployment data file
The deployments.csv file looks like this:
camera_id,deployment_id,latitude,longitude,elevation
tp85-001,bvnp-dep001,-33.XX,151.XX,159
tp85-002,bvnp-dep011,-33.XX,151.XX,115
except that ‘XX’ is a decimal value in the real file – I’m not going to publish the locations of my cameras. The key features of the file are: (1) the deployment ID, which matches the directory name where the image and video files live, and (2) the coordinates and elevation, obtained from an image of the deployment site taken on an iPhone, which will be used to create the missing GPS metadata for the trail camera files.
Read files and filenames into R
Alright, let’s get into the R code. Load the required libraries, then read in the deployment data CSV, and create a data frame with a column that contains the full path to the image and video files for each deployment.
library(dplyr)
library(readr)
library(purrr)
library(stringr)
library(magick)
library(gtools)

# get deployment data
deployments <- read_csv("~/Documents/CamparkT85/data/deployments.csv")

# get file names
files <- list.files("~/Documents/CamparkT85/cameras", full.names = TRUE, recursive = TRUE)
files_df <- tibble(SourceFile = files)
At this stage files_df has just one column, containing the full path to each image or video file:
# A tibble: 4 × 1
  SourceFile
  <chr>
1 /Users/neilsaunders/Documents/CamparkT85/cameras/t85-002/bvnp-dep011/2022-10-07 18.40.47.mp4
2 /Users/neilsaunders/Documents/CamparkT85/cameras/t85-002/bvnp-dep011/2022-10-09 13.09.49.jpg
3 /Users/neilsaunders/Documents/CamparkT85/cameras/t85-002/bvnp-dep011/2022-10-09 13.09.54.jpg
4 /Users/neilsaunders/Documents/CamparkT85/cameras/t85-002/bvnp-dep011/2022-10-09 13.09.58.jpg
Functions
Next, some functions to process the files. The first one takes an image and tries to extract the date and time from the timestamp in the lower-left corner.
# function to get date and time
extract_datetime <- function(imgfile) {
  ocr_data <- image_read(imgfile) %>%
    image_crop('1795x65', gravity = "southeast") %>%
    image_negate() %>%
    image_convert(type = "grayscale") %>%
    image_ocr_data(options = list(tessedit_char_whitelist = '%0123456789/-:CFamPrkT '))

  ts_date <- ocr_data$word[str_detect(ocr_data$word, "^\\d{4}\\/\\d{2}\\/\\d{2}$")]
  ts_time <- ocr_data$word[str_detect(ocr_data$word, "^\\d{2}:\\d{2}:\\d{2}$")]

  dt <- paste0(ts_date, " ", ts_time)
  dt <- ifelse(nchar(dt) == 19, dt, "")
  dt
}
What’s happening here? We’re using the excellent magick package to read in the image file and crop the bottom right portion, containing the timestamp. You’ll need to fiddle with the width and height to get it right. Then we negate and convert the image so that the text is black on white:

and finally run OCR to extract text from the image data. We can improve the character recognition using a whitelist of symbols that we expect to find.
The final step returns a tibble where if successful, one row contains the date and another the time.
# A tibble: 6 × 3
  word       confidence bbox
  <chr>           <dbl> <chr>
1 k60%              0   0,0,385,61
2 2022/10/07       12.5 399,0,786,61
3 07:40:06         90.6 823,0,1101,65
4 11C              46.0 1168,5,1269,61
5 51F              88.1 1311,0,1427,62
6 CPT85002         88.9 1461,0,1795,61
However, the row index is not consistent, so we use str_detect to find out where they are. If it all works, the function returns the date-time as characters.
The next function simply extracts the deployment ID from the full path to the file, using the split_path function from the gtools package. This is used to match the ID from the deployments CSV file.
# function to get deployment from path
get_deployment <- function(imgfile) {
  split_path(imgfile)[2]
}
The last function calls the external ffmpeg software to extract the first frame from a video file and save it as an image. This is used, as with the image files, to extract the timestamp.
# function to get 1st frame of mp4 file
extract_frame <- function(vidfile) {
  outfile <- paste0("'", vidfile, ".jpg'")
  cmd <- paste0("ffmpeg -y -i '", vidfile, "' -vframes 1 ", outfile)
  system(cmd)

  outfile <- gsub("'", "", outfile)
  outfile
}
Process the images
We can now process the image files by piping the data frame of file names into a chain which applies the relevant functions and adds new columns with the camera model, image timestamp and GPS information.
# process images
files_df_jpg <- files_df %>%
  filter(str_detect(SourceFile, "\\.jpg")) %>%
  mutate(Model = "Campark T85",
         DateTimeOriginal = map_chr(SourceFile, extract_datetime),
         deployment_id = map_chr(SourceFile, get_deployment)) %>%
  left_join(deployments) %>%
  mutate(GPSLatitudeRef = "S", GPSLongitudeRef = "E") %>%
  select(SourceFile, Model, DateTimeOriginal, GPSLatitude = latitude, GPSLongitude = longitude, GPSAltitude = elevation, GPSLatitudeRef, GPSLongitudeRef)
Here are the new columns. The column names are important: they are specific EXIF tags used by the JPEG image format which will be applied to the images in a later step.
# A tibble: 3 × 7
  Model       DateTimeOriginal    GPSLatitude GPSLongitude GPSAltitude GPSLatitudeRef GPSLongitudeRef
  <chr>       <chr>                     <dbl>        <dbl>       <dbl> <chr>          <chr>
1 Campark T85 2022/10/07 07:40:06       -33.7         151.         115 S              E
2 Campark T85 2022/10/07 07:40:11       -33.7         151.         115 S              E
3 Campark T85 2022/10/07 07:40:12       -33.7         151.         115 S              E
Process the videos
Videos are processed a little differently. First, we have to extract a frame and save it as an image file to supply to the function extract_datetime. Second, MP4 files use different keys and tags to store date, time and GPS information.
# process video
files_df_mp4 <- files_df %>%
  filter(str_detect(SourceFile, "\\.mp4")) %>%
  mutate(Model = "Campark T85",
         FrameFile = map_chr(SourceFile, extract_frame),
         CreateDate = map_chr(FrameFile, extract_datetime),
         deployment_id = map_chr(SourceFile, get_deployment)) %>%
  left_join(deployments) %>%
  mutate(GPSCoordinates = paste(latitude, longitude, elevation, sep = ",")) %>%
  select(SourceFile, FrameFile, `Keys:Model` = Model, `Keys:CreationDate` = CreateDate, `Keys:GPSCoordinates` = GPSCoordinates)

unlink(files_df_mp4$FrameFile)
The new columns for a video file. You’ll need to scroll right to see them all.
# A tibble: 1 × 4
  FrameFile                                                                                        `Keys:Model` `Keys:CreationDate` `Keys:GPSCoordinates`
  <chr>                                                                                            <chr>        <chr>               <chr>
1 /Users/neilsaunders/Documents/CamparkT85/cameras/t85-002/bvnp-dep011/2022-10-07 18.40.47.mp4.jpg Campark T85  2022/10/07 07:40:16 -33.XX,151.XX,115
Write CSV files and run exiftool
The last step in R is to write out the data for image and video to CSV files.
# write csv
files_df_jpg %>%
  write_csv("~/Documents/CamparkT85/exiftool_jpg.csv")

# write csv
files_df_mp4 %>%
  select(-FrameFile) %>%
  write_csv("~/Documents/CamparkT85/exiftool_mp4.csv")
We should inspect the CSV file manually and edit any errors: the OCR is usually very good, but does occasionally make mistakes. The year 2022 may become 2027, for example.
Now we can get into exiftool. This is a terrific piece of open-source software for manipulating metadata in a wide variety of image and video formats. It has far too many features to go into here, so all we need to know is that you can pass a properly-formatted CSV file (which we just made) and an input directory to exiftool, and it will apply the metadata attributes from the CSV file to the image or video files in the directory. For example:
exiftool -csv=exiftool_jpg.csv -overwrite_original cameras/t85-002/bvnp-dep011/
Provided that the first column, SourceFile, contains the complete absolute path to the files, exiftool will run successfully from within any directory, after emitting a warning if the path doesn’t match the current directory, and finish by printing the number of files that were altered.
But did it work? We can use exiftool to look inside the files and return only the tags we specify:
exiftool -DateTimeOriginal -Model -GPSPosition cameras/t85-002/bvnp-dep011/2022-10-09\ 13.09.58.jpg

Date/Time Original              : 2022:10:07 07:40:12
Camera Model Name               : Campark T85
GPS Position                    : 33 deg 40' 34.43" S, 151 deg 5' 37.89" E
Looks good! The final test: does the date/time and GPS metadata display correctly in Mac Photos, which was a major reason for embarking on this project in the first place.

In summary: R + magick + exiftool, an excellent combination for adding or correcting metadata in your image files.
R-bloggers.com offers daily e-mail updates about R news and tutorials about learning R and many other topics. Click here if you're looking to post or find an R/data-science job.
Want to share your content on R-bloggers? click here if you have a blog, or here if you don't.