
The R qgraph Package: Using R to Visualize Complex Relationships Among Variables in a Large Dataset, Part One
Want to share your content on R-bloggers? click here if you have a blog, or here if you don't.
The R qgraph Package: Using R to Visualize Complex Relationships Among Variables in a Large Dataset, Part One
A Tutorial by D. M. Wiig, Professor of Political Science, Grand View University
In my most recent tutorials I have discussed the use of the tabplot() package to visualize multivariate mixed data types in large datasets. This type of table display is a handy way to identify possible relationships among variables, but is limited in terms of interpretation and the number of variables that can be meaningfully displayed.
Social science research projects often start out with many potential independent predictor variables for a given dependant variable. If these variables are all measured at the interval or ratio level a correlation matrix often serves as a starting point to begin analyzing relationships among variables.
In this tutorial I will use the R packages SemiPar, qgraph and Hmisc in addition to the basic packages loaded when R is started. The code is as follows:
###################################################
#data from package SemiPar; dataset milan.mort
#dataset has 3652 cases and 9 vars
##################################################
install.packages(“SemiPar”)
install.packages(“Hmisc”)
install.packages(“qgraph”)
library(SemiPar)
####################################################
One of the datasets contained in the SemiPar packages is milan.mort. This dataset contains nine variables and data from 3652 consecutive days for the city of Milan, Italy. The nine variables in the dataset are as follows:
rel.humid (relative humidity)
tot.mort (total number of deaths)
resp.mort (total number of respiratory deaths)
SO2 (measure of sulphur dioxide level in ambient air)
TSP (total suspended particles in ambient air)
day.num (number of days since 31st December, 1979)
day.of.week (1=Monday; 2=Tuesday; 3=Wednesday; 4=Thursday; 5=Friday; 6=Saturday; 7=Sunday
holiday (indicator of public holiday: 1=public holiday, 0=otherwise
mean.temp (mean daily temperature in degrees celsius)
To look at the structure of the dataset use the following
#########################################
library(SemiPar)
data(milan.mort)
str(milan.mort)
###############################################
Resulting in the output:
> str(milan.mort)
‘data.frame’: 3652 obs. of 9 variables:
$ day.num : int 1 2 3 4 5 6 7 8 9 10 …
$ day.of.week: int 2 3 4 5 6 7 1 2 3 4 …
$ holiday : int 1 0 0 0 0 0 0 0 0 0 …
$ mean.temp : num 5.6 4.1 4.6 2.9 2.2 0.7 -0.6 -0.5 0.2 1.7 …
$ rel.humid : num 30 26 29.7 32.7 71.3 80.7 82 82.7 79.3 69.3 …
$ tot.mort : num 45 32 37 33 36 45 46 38 29 39 …
$ resp.mort : int 2 5 0 1 1 6 2 4 1 4 …
$ SO2 : num 267 375 276 440 354 …
$ TSP : num 110 153 162 198 235 …
As is seen above, the dataset contains 9 variables all measured at the ratio level and 3652 cases.
In doing exploratory research a correlation matrix is often generated as a first attempt to look at inter-relationships among the variables in the dataset. In this particular case a researcher might be interested in looking at factors that are related to total mortality as well as respiratory mortality rates.
A correlation matrix can be generated using the cor function which is contained in the stats package. There are a variety of functions for various types of correlation analysis. The cor function provides a fast method to calculate Pearson’s r with a large dataset such as the one used in this example.
To generate a zero order Pearson’s correlation matrix use the following:
###############################################
#round the corr output to 2 decimal places
#put output into variable cormatround
#coerce data to matrix
#########################################
library(Hmisc)
cormatround round(cormatround, 2)
#################################################
The output is:
> cormatround > round(cormatround, 2) Day.num day.of.week holiday mean.temp rel.humid tot.mort resp.mort SO2 TSP day.num 1.00 0.00 0.01 0.02 0.12 -0.28 0.22 -0.34 0.07 day.of.week 0.00 1.00 0.00 0.00 0.00 -0.05 0.03 -0.05 -0.05 holiday 0.01 0.00 1.00 -0.07 0.01 0.00 0.01 0.00 -0.01 mean.temp 0.02 0.00 -0.07 1.00 -0.25 -0.43 -0.26 -0.66 -0.44 rel.humid 0.12 0.00 0.01 -0.25 1.00 0.01 -0.03 0.15 0.17 tot.mort -0.28 -0.05 0.00 -0.43 0.01 1.00 0.47 0.44 0.25 resp.mort -0.22 -0.03 -0.01 -0.26 -0.03 0.47 1.00 0.32 0.15 SO2 -0.34 -0.05 0.00 -0.66 0.15 0.44 0.32 1.00 0.63 TSP 0.07 -0.05 -0.01 -0.44 0.17 0.25 0.15 0.63 1.00 |
|
|
The matrix can be examined to look at intercorrelations among the nine variables, but it is very difficult to detect patterns of correlations within the matrix. Also, when using the cor() function raw Pearson’s coefficients are reported, but significance levels are not.
A correlation matrix with significance can be generated by using the rcorr() function, also found in the Hmisc package. The code is:
#############################################
library(Hmisc)
rcorr(as.matrix(milan.mort, type=”pearson”))
###################################################
The output is:
> rcorr(as.matrix(milan.mort, type="pearson"))
           day.num day.of.week holiday mean.temp rel.humid tot.mort resp.mort   SO2   TSP
day.num       1.00       0.00    0.01      0.02      0.12    -0.28  -0.22 -0.34  0.07
day.of.week   0.00        1.00    0.00      0.00      0.00    -0.05 -0.03 -0.05 -0.05
holiday       0.01        0.00    1.00     -0.07      0.01     0.00 -0.01  0.00 -0.01
mean.temp     0.02        0.00   -0.07      1.00     -0.25    -0.43 -0.26 -0.66 -0.44
rel.humid     0.12        0.00    0.01     -0.25      1.00     0.01 -0.03  0.15  0.17
tot.mort     -0.28       -0.05    0.00     -0.43      0.01     1.00  0.47  0.44  0.25
resp.mort    -0.22       -0.03   -0.01     -0.26     -0.03     0.47  1.00  0.32  0.15
SO2          -0.34       -0.05    0.00     -0.66      0.15     0.44  0.32  1.00  0.63
TSP           0.07       -0.05   -0.01     -0.44      0.17     0.25  0.15  0.63  1.00

n= 3652


P
            day.num day.of.week holiday mean.temp rel.humid tot.mort resp.mort SO2    TSP
day.num             0.9771     0.5349   0.2220    0.0000    0.0000  0.0000  0.0000
day.of.week 0.9771              0.7632  0.8727    0.8670    0.0045  0.1175   0.0061
holiday     0.5349  0.7632              0.0000    0.4648    0.8506  0.6115    0.7793 0.4108
mean.temp   0.2220  0.8727      0.0000            0.0000    0.0000  0.0000    0.0000 0.0000
rel.humid   0.0000  0.8670      0.4648  0.0000              0.3661  0.1096    0.0000 0.0000
tot.mort    0.0000  0.0045      0.8506  0.0000    0.3661            0.0000    0.0000 0.0000
resp.mort   0.0000  0.1175      0.6115  0.0000    0.1096    0.0000            0.0000 0.0000
SO2         0.0000  0.0024      0.7793  0.0000    0.0000    0.0000  0.0000           0.0000
TSP         0.0000  0.0061      0.4108  0.0000    0.0000    0.0000  0.0000    0.0000
|
|
|
In a future tutorial I will discuss using significance levels and correlation strengths as methods of reducing complexity in very large correlation network structures.
The recently released package qgraph () provides a number of interesting functions that are useful in visualizing complex inter-relationships among a large number of variables. To quote from the CRAN documentation file qraph() “Can be used to visualize data networks as well as provides an interface for visualizing weighted graphical models.” (see CRAN documentation for ‘qgraph” version 1.4.2. See also http://sachaepskamp.com/qgraph).
The qgraph() function has a variety of options that can be used to produce specific types of graphical representations. In this first tutorial segment I will use the milan.mort dataset and the most basic qgraph functions to produce a visual graphic network of intercorrelations among the 9 variables in the dataset.
The code is as follows:
###################################################
library(qgraph)
#use cor function to create a correlation matrix with milan.mort dataset
#and put into cormat variable
###################################################
cormat=cor(milan.mort) #correlation matrix generated
###################################################
###################################################
#now plot a graph of the correlation matrix
###################################################
qgraph(cormat, shape=”circle”, posCol=”darkgreen”, negCol=”darkred”, layout=”groups”, vsize=10)
###################################################
This code produces the following correlation network:
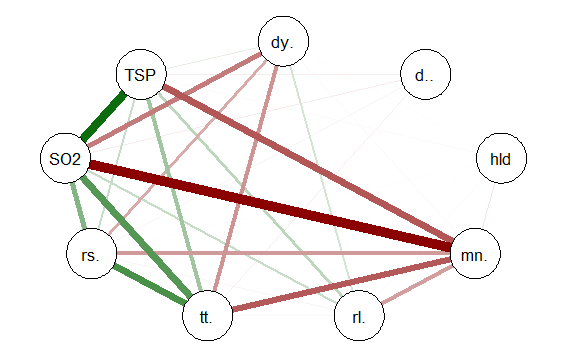
The correlation network provides a very useful visual picture of the intercorrelations as well as positive and negative correlations. The relative thickness and color density of the bands indicates strength of Pearson’s r and the color of each band indicates a positive or negative correlation – red for negative and green for positive.
By changing the “layout=” option from “groups” to “spring” a slightly different perspective can be seen. The code is:
########################################################
#Code to produce alternative correlation network:
#######################################################
library(qgraph)
#use cor function to create a correlation matrix with milan.mort dataset
#and put into cormat variable
##############################################################
cormat=cor(milan.mort) #correlation matrix generated
##############################################################
###############################################################
#now plot a circle graph of the correlation matrix
##########################################################
qgraph(cormat, shape=”circle”, posCol=”darkgreen”, negCol=”darkred”, layout=”spring”, vsize=10)
###############################################################
The graph produced is below:

Once again the intercorrelations, strength of r and positive and negative correlations can be easily identified. There are many more options, types of graph and procedures for analysis that can be accomplished with the qgraph() package. In future tutorials I will discuss some of these.

R-bloggers.com offers daily e-mail updates about R news and tutorials about learning R and many other topics. Click here if you're looking to post or find an R/data-science job.
Want to share your content on R-bloggers? click here if you have a blog, or here if you don't.