
RStudio in Docker – now share your R code effortlessly!
Want to share your content on R-bloggers? click here if you have a blog, or here if you don't.
If you are a full time data science practitioner and have passed through the stages of starting out with the Titanic dataset and working through the various exercises in Kaggle , you would know by now that we wish real world data problems are that simple, but they are not! This post is about just one of the many challenges one could face, which is sharing your R code to someone who does not use R and who doesn’t have time to install every single dependency your code needs to run in their system. Simple solution – Docker!
The genius theory behind Docker is what’s called containerization. It packages applications as images that contain everything needed to run them: code, runtime environment, libraries, and configuration. Images run in containers, which are discrete processes that take up only as many resources as any other executable.
Here’s how to install Docker in Mac and Ubuntu.
Now, excellent work has already been done in Dockerizing RStudio and RShiny by Rocker. For some reason, the Dockerfile with RStudio+Tidyverse was not working in my machine, so here I will show the fixed Dockerfile that is based on Rocker’s base RStudio image, add example R packages you may need for your code to run and finally how to build the image with the Dockerfile and then run it. You should be able to run RStudio and RShiny app inside the container.
First here is the Dockerfile:
FROM rocker/rstudio:latest

RUN apt-get update -qq && apt-get -y --no-install-recommends install \
libxml2-dev \
libxt-dev \
libjpeg-dev \
libglu1-mesa-dev \
libcairo2-dev \
libsqlite3-dev \
libmariadbd-dev \
libmariadb-client-lgpl-dev \
libpq-dev \
libssh2-1-dev \
unixodbc-dev \
&& R -e "source('https://bioconductor.org/biocLite.R')" \
&& install2.r --error \
--deps TRUE \
shiny \
shinyWidgets \
shinydashboard \
plyr \
dplyr \
knitr \
tibbletime \
anomalize \
anytime \
tidyverse \
DT
Note that the first half of the Dockerfile has all the dependencies for R installation and second half is some of the R packages we would need. Whatever R package you need for your code to run should be installed through the Dockerfile, so make sure you add all your dependencies here.
Now that you have the Dockerfile ready, building the image and running it is pretty simple!
And before that, say you have an R Script for a Shiny app that you want inside the RStudio, and you want to edit it / run it from RStudio inside the container, it’s simple: there is something called volume mounting in Docker, where you share the files in your host machines as a volume mount inside the container. Let’s see how all this works.
Build the Docker image:
For building the image, run the following command in the same directory that your Dockerfile is in:
sudo docker build -f Dockerfile.R -t awesomeR .
In the above command, Dockerfile.R is the name of my Dockerfile, and awesomeR is the name of the image I’m gonna build, you can name both your Dockerfile and the name of your image as whatever you want here! And don’t forget the “.” at the end.
The building of this image would take like 20 to 30 minutes, so be patient!!
Now to run the image, first note the path to the directory in which your R files are present, which you need inside the container.
Running the Docker container:
docker run -d -p 28788:8787 --name myContainerName -e USER='harini' -e PASSWORD='password' -e ROOT=TRUE -v /home/harini/myFolder:/home/rstudio/dockspace awesomeR:latest
In the above command, you are specifying the port in which your Rstudio will open, “myContainerName” following the “–name” is the name of your container and can be anything you prefer, give whatever username and password you want (you would use the same username and password to login to the RStudio inside the container). Now to the volume mount part: the path that immediately follows the -v flag, here “/home/harini/myFolder” is the path where my R files are, in my host machine, the path following the semicolon “/home/rstudio/dockspace” is the path in which you can access these same files inside the container, so you don’t have to change the second part, just change the first path to wherever your files are in your host machine. “awesomeR is” the name of the image you built before.
Now after running the above command, go to localhost:28788 in your browser, you should see RStudio login page. Login with the username and password that you had given in the above command. You should see the folder “dockspace” that you created in the docker run command. Click on that and you should see the R files that are there in your host machine as well.
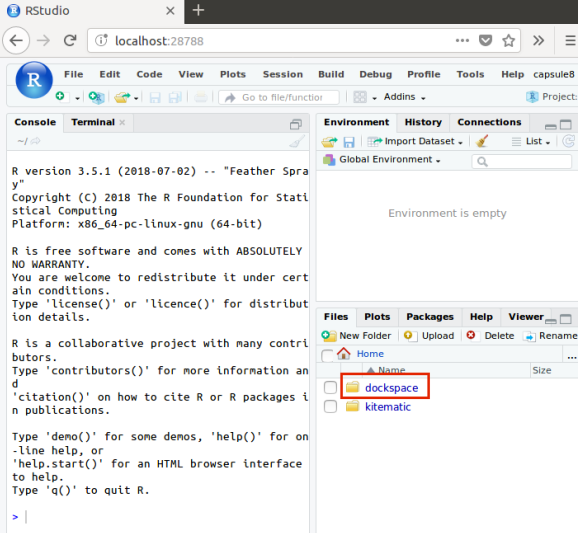
When you click on “dockspace” , you should see the your R files.
You can find the code examples here in github , I have a simple example Shiny app here if you simply want to clone it and try the above steps.
Hope this helps!
R-bloggers.com offers daily e-mail updates about R news and tutorials about learning R and many other topics. Click here if you're looking to post or find an R/data-science job.
Want to share your content on R-bloggers? click here if you have a blog, or here if you don't.