
Adding different annotation to each facet in ggplot
Want to share your content on R-bloggers? click here if you have a blog, or here if you don't.
Help! The same annotations go on every facet!


(with thanks to a student for sending me her attempt).
This is a question I get fairly often and the answer is not straightforward especially for those that are relatively new to R and ggplot2.
In this post, I will show you how to add different annotations to each facet. More like this:

This is useful in its own right but can also help you understand ggplot better.
I will assume you have R Studio installed and have at least a little experience with it but I’m aiming to make this do-able for novices. I’ll also assume you’ve analysed your data so you know what annotations you want to add.
Faceting is a very useful feature of ggplot which allows you to efficiently plot subsets of your data next to each other.
In this example the data are the wing lengths for males and females of two imaginary species of butterfly in two regions, north and south. Some of the results of a statistical analysis are shown with annotation.
1. Preparation
The first thing you want to do is make a folder on your computer where your code and the data for plotting will live. This is your working directory.
Now get a copy of the data by saving this file the folder you just made.
2. Start in RStudio
Start R Studio and set your working directory to the folder you created:

Now start a new script file:

and save it as figure.R or similar.
3. Load packages
Make the packages you need available for use in this R Studio session by adding this code to your script and running it.
# package loading
library(ggplot2)
library(Rmisc)
4. Read the data in to R
The data are in a plain text file where the first row gives the column names. It can be read in to a dataframe with the read.table() command:
butter <- read.table("butterflies.txt", header = TRUE)
This each row in this data set is an individual butterfly and the columns are four variables:
winglenthe wing length (in millimeters) of an individualsppits species, one of “F.concocti” or “F.flappa”sexits sex, one of “female” or “male”regionwhere it is from, one of “North” or “South”
5. Summarise the data
Our plot has the means and standard errors for each group and this requires us to summarize over the replicates which we can do with the summarySE() function:
buttersum <- summarySE(data = butter, measurevar = "winglen",
                     groupvars = c("spp", "sex", "region"))
buttersum

##          spp    sex region  N  winglen       sd        se       ci
## 1 F.concocti female  North 10 25.93591 4.303011 1.3607315 3.078189
## 2 F.concocti female  South 10 31.37000 4.275265 1.3519574 3.058340
## 3 F.concocti   male  North 10 23.22876 4.250612 1.3441617 3.040705
## 4 F.concocti   male  South 10 24.97000 4.957609 1.5677337 3.546460
## 5   F.flappa female  North 10 33.18389 4.286312 1.3554509 3.066243
## 6   F.flappa female  South 10 24.67000 3.270423 1.0341986 2.339520
## 7   F.flappa   male  North 10 24.46586 5.492053 1.7367398 3.928778
## 8   F.flappa   male  South 10 23.45000 3.012290 0.9525696 2.154862
A group is a species-sex-region combination.
6. Plot
We have four variables to plot. Three are explanatory: species, sex and region. We map one of the explanatory variables to the x-axis, one to different colours and one to the facets.
To plot North and South on separate facets, we tell facet_grid() to plot everything else (.) for each region:
ggplot(data = buttersum, aes(x = spp, y = winglen)) +
  geom_point(aes(colour = sex), position = position_dodge(width = 1)) +
  geom_errorbar(aes(colour = sex, ymin = winglen - se, ymax = winglen + se),
                width = .2, position = position_dodge(width = 1)) +
  ylim(0, 40) +
  facet_grid(. ~ region)

Build understanding
This section will help you understand why facet annotations are done as they are but you can go straight to 7. Create a dataframe for the annotation information if you just want the code.
We plan to facet by region but in order to understand better, it is useful to first plot just one region. We can subset the data to achieve that:
a) Subset
# subset the northern region
butterN <- butter[butter$region == "North",]
b) Summarise data subset for plotting
butterNsum <- summarySE(data = butterN, measurevar = "winglen",
                       groupvars = c("spp", "sex"))
butterNsum

##          spp    sex  N  winglen       sd       se       ci
## 1 F.concocti female 10 25.93591 4.303011 1.360732 3.078189
## 2 F.concocti   male 10 23.22876 4.250612 1.344162 3.040705
## 3   F.flappa female 10 33.18389 4.286312 1.355451 3.066243
## 4   F.flappa   male 10 24.46586 5.492053 1.736740 3.928778
c) Plot subset
Since we are dealing only with data from the North, we have just three variables to plot. We map one of the explanatory variables to the x-axis and the other to different colours:
ggplot(data = butterNsum, aes(x = spp, y = winglen, colour = sex)) +
  geom_point(position = position_dodge(width = 1)) +
  geom_errorbar(aes(ymin = winglen - se, ymax = winglen + se),
                width = .2, position = position_dodge(width = 1)) +
  ylim(0, 40)

data = butterNsumtells ggplot which dataframe to plot (the summary)aes(x = spp, y = winglen, colour = sex)the “aesthetic mappings” specify where to put each variable. Aesthetic mappings given in theggplot()statement will apply to every “layer” in the plot unless otherwise specified.
geom_point()the first “layer” adds pointsposition = position_dodge(width = 1)indicates female and male means should be plotted side-by-side for each species not on top on each other
geom_errorbar()the second layer adds the error bars. These must also be position dodged so they appear on the points.aes(ymin = winglen - se, ymax = winglen + se)The error bars need new aesthetic mappings because they are not at winglen (the mean in the summary) but at the mean – the standard error and the mean + the standard error. Since all of that information is inside butterNsum, we do not need to give the data argument again.
d) Annotate this plot (i)
The annotation is composed of three lines – or segments – and some text. Each segment has a start (x, y) and an end (xend, yend) which we need to specify. The text is centered on its (x, y)
The x-axis has two categories which have the internal coding of 1 and 2. We want the annotation to start a bit before 2 and finish a bit after 2.
Note that position_dodge() units are twice the category axis units in this example.
ggplot(data = butterNsum, aes(x = spp, y = winglen, colour = sex)) +
  geom_point(position = position_dodge(width = 1)) +
  geom_errorbar(aes(ymin = winglen - se, ymax = winglen + se),
                width = .2, position = position_dodge(width = 1)) +
  geom_text(x = 2,  y = 38,
           label = "***",
           colour = "black") +
  geom_segment(x = 1.75, xend = 1.75,
           y = 36, yend = 37,
           colour = "black") +
  geom_segment(x = 2.25, xend = 2.25,
           y = 36, yend = 37,
           colour = "black") +
  geom_segment(x = 1.75, xend = 2.25,
           y = 37, yend = 37,
           colour = "black") +
  ylim(0, 40)

e) Annotate this plot (ii)
Instead of hard coding the co-ordinates into the plot, we could have put them in a dataframe with a column for each x or y as follows:
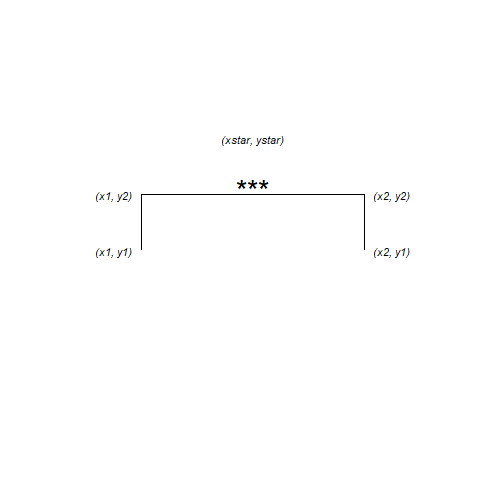
anno <- data.frame(x1 = 1.75, x2 = 2.25, y1 = 36, y2 = 37, xstar = 2, ystar = 38, lab = "***")
anno

##     x1   x2 y1 y2 xstar ystar lab
## 1 1.75 2.25 36 37     2    38 ***
Then give a dataframe argument to geom_segment() and geom_text() and the aesthetic mappings for that dataframe. We also need to move the colour mapping from the ggplot() statement to the geom_point() and geom_errorbar().
This is because the mappings applied in the ggplot() will apply to every layer unless otherwise specified and if the colour mapping stays there, geom_segment() and geom_text() will try to find the variable ‘sex’ in the anno dataframe.
ggplot(data = butterNsum, aes(x = spp, y = winglen)) +
  geom_point(aes(colour = sex), position = position_dodge(width = 1)) +
  geom_errorbar(aes(colour = sex, ymin = winglen - se, ymax = winglen + se),
                width = .2, position = position_dodge(width = 1)) +
  ylim(0, 40) +
  geom_text(data = anno, aes(x = xstar,  y = ystar, label = lab)) +
  geom_segment(data = anno, aes(x = x1, xend = x1,
           y = y1, yend = y2),
           colour = "black") +
  geom_segment(data = anno, aes(x = x2, xend = x2,
           y = y1, yend = y2),
           colour = "black") +
  geom_segment(data = anno, aes(x = x1, xend = x2,
           y = y2, yend = y2),
           colour = "black")
7. Create a dataframe for the annotation information
The easiest way to annotate for each facet separately is to create a dataframe with a row for each facet:

anno <- data.frame(x1 = c(1.75, 0.75), x2 = c(2.25, 1.25),
                   y1 = c(36, 36), y2 = c(37, 37),
                   xstar = c(2, 1), ystar = c(38, 38),
                   lab = c("***", "**"),
                   region = c("North", "South"))
anno

##     x1   x2 y1 y2 xstar ystar lab region
## 1 1.75 2.25 36 37     2    38 ***  North
## 2 0.75 1.25 36 37     1    38  **  South
7. Annotate the plot
Use the annotation dataframe as the value for the data argument in geom_segment() and geom_text()
New aesthetic mappings will be needed too:
ggplot(data = buttersum, aes(x = spp, y = winglen)) +
  geom_point(aes(colour = sex), position = position_dodge(width = 1)) +
  geom_errorbar(aes(colour = sex, ymin = winglen - se, ymax = winglen + se),
                width = .2, position = position_dodge(width = 1)) +
  ylim(0, 40) +
  geom_text(data = anno, aes(x = xstar,  y = ystar, label = lab)) +
  geom_segment(data = anno, aes(x = x1, xend = x1,
           y = y1, yend = y2),
           colour = "black") +
  geom_segment(data = anno, aes(x = x2, xend = x2,
           y = y1, yend = y2),
           colour = "black") +
  geom_segment(data = anno, aes(x = x1, xend = x2,
           y = y2, yend = y2),
           colour = "black")+
  facet_grid(. ~ region)

Or a little more report friendly:
ggplot(data = buttersum, aes(x = spp, y = winglen)) +
  geom_point(aes(shape = sex), position = position_dodge(width = 1), size = 2) +
  scale_shape_manual(values = c(1, 19), labels = c("Female", "Male") )+
  geom_errorbar(aes(group = sex, ymin = winglen - se, ymax = winglen + se),
                width = .2, position = position_dodge(width = 1)) +
  ylim(0, 40) +
  ylab("Wing length (mm)") +
  xlab("") +
  geom_text(data = anno, aes(x = xstar,  y = ystar, label = lab)) +
  geom_segment(data = anno, aes(x = x1, xend = x1,
           y = y1, yend = y2),
           colour = "black") +
  geom_segment(data = anno, aes(x = x2, xend = x2,
           y = y1, yend = y2),
           colour = "black") +
  geom_segment(data = anno, aes(x = x1, xend = x2,
           y = y2, yend = y2),
           colour = "black")+
  facet_grid(. ~ region) +
  theme(panel.background = element_rect(fill = "white", colour = "black"),
        strip.background = element_rect(fill = "white", colour = "black"),
        legend.key = element_blank(),
        legend.title = element_blank())

If you want to add images to each facet you can use the ggimage package. I covered this in a previous blog, Fun and easy R graphs with images
You need to add column to your annotation dataframe.
Package references
Hope R.M. (2013). Rmisc: Rmisc: Ryan Miscellaneous. R package version 1.5. https://CRAN.R-project.org/package=Rmisc
Wickham H. (2016). ggplot2: Elegant Graphics for Data Analysis. Springer-Verlag New York. ISBN 978-3-319-24277-4
Yu G. (2018). ggimage: Use Image in ‘ggplot2’. R package version 0.1.7. https://CRAN.R-project.org/package=ggimage
R and all it’s packages are free so don’t forget to cite the awesome contributors.
How to cite packages in R
R-bloggers.com offers daily e-mail updates about R news and tutorials about learning R and many other topics. Click here if you're looking to post or find an R/data-science job.
Want to share your content on R-bloggers? click here if you have a blog, or here if you don't.