
Online R and Plotly Graphs: Canadian and U.S. Maps, Old Faithful with Multiple Axes, & Overlaid Histograms
Want to share your content on R-bloggers? click here if you have a blog, or here if you don't.
Guest post by Matt Sundquist of plot.ly.
Plotly is a social graphing and analytics platform. Plotly’s R library lets you make and share publication-quality graphs online. Your work belongs to you, you control privacy and sharing, and public use is free (like GitHub). We are in beta, and would love your feedback, thoughts, and advice.
1. Installing Plotly
Let’s install Plotly. Our documentation has more details.
install.packages("devtools")
library("devtools")
devtools::install_github("R-api","plotly")
Then signup online or like this:
library(plotly)
response = signup (username = 'yourusername', email= 'youremail')
…
Thanks for signing up to plotly! Your username is: MattSundquist Your temporary password is: pw. You use this to log into your plotly account at https://plot.ly/plot. Your API key is: “API_Key”. You use this to access your plotly account through the API.
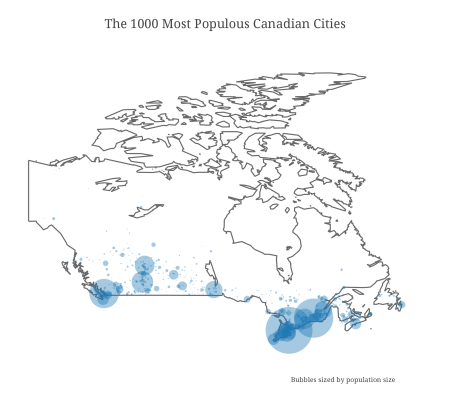
2. Canadian Population Bubble Chart
Our first graph was made at a Montreal R Meetup by Plotly’s own Chris Parmer. We’ll be using the maps package. You may need to load it:
install.packages("maps")
Then:
library(plotly)
p <- plotly(username="MattSundquist", key="4om2jxmhmn")
library(maps)
data(canada.cities)
trace1 <- list(x=map(regions="canada")$x,
  y=map(regions="canada")$y)

trace2 <- list(x= canada.cities$long,
  y=canada.cities$lat,
  text=canada.cities$name,
  type="scatter",
  mode="markers",
  marker=list(
    "size"=sqrt(canada.cities$pop/max(canada.cities$pop))*100,
    "opacity"=0.5)
  )

response <- p$plotly(trace1,trace2)
url <- response$url
filename <- response$filename
browseURL(response$url)
In our graph, the bubble size represents the city population size. Shown below is the GUI, where you can annotate, select colors, analyze and add data, style traces, place your legend, change fonts, and more.

Editing from the GUI, we make a styled version. You can zoom in and hover on the points to find out about the cities. Want to make one for another country? We’d love to see it.
And, here is said meetup, in action:

You can also add in usa and us.cities:

3. Old Faithful and Multiple Axes
Ben Chartoff’s graph shows the correlation between a bimodal eruption time and a bimodal distribution of eruption length. The key series are: a histogram scale of probability, Eruption Time scale in minutes, and a scatterplot showing points within each bin on the x axis. The graph was made with this gist.

4. Plotting Two Histograms Together
Suppose you are studying correlations in two series (Popular Stack Overflow ?). You want to find overlap. You can plot two histograms together, one for each series. The overlapping sections are the darker orange, automatically rendered if you set barmode to ‘overlay’.
library(plotly)
p <- plotly(username="Username", key="API_KEY")

x0 <- rnorm(500)
x1 <- rnorm(500)+1

data0 <- list(x=x0,
  name = "Series One",
  type='histogramx',
  opacity = 0.8)

data1 <- list(x=x1,
  name = "Series Two",
  type='histogramx',
  opacity = 0.8)

layout <- list(
  xaxis = list(
  ticks = "",
  gridcolor = "white",zerolinecolor = "white",
  linecolor = "white"
 ),
 yaxis = list(
  ticks = "",
  gridcolor = "white",
  zerolinecolor = "white",
  linecolor = "white"
 ),
 barmode='overlay',
 # style background color. You can set the alpha by adding an a.
 plot_bgcolor = 'rgba(249,249,251,.85)'
)

response <- p$plotly(data0, data1, kwargs=list(layout=layout))
url <- response$url
filename <- response$filename
browseURL(response$url)

5. Plotting y1 and y2 in the Same Plot
Plotting two lines or graph types in Plotly is straightforward. Here we show y1 and y2 together (Popular SO ?).
library(plotly)
p <- plotly(username="Username", key="API_KEY")

# enter data
x <- seq(-2, 2, 0.05)
y1 <- pnorm(x)
y2 <- pnorm(x,1,1)

# format, listing y1 as your y.
First <- list(
  x = x,
  y = y1,
  type = 'scatter',
  mode = 'lines',
  marker = list(
   color = 'rgb(0, 0, 255)',
   opacity = 0.5)
  )

# format again, listing y2 as your y.
Second <- list(
  x = x,
  y = y2,
  type = 'scatter',
  mode = 'lines',
  opacity = 0.8,
  marker = list(
   color = 'rgb(255, 0, 0)')
  )

And a shot of the Plotly gallery, as seen at the Montreal meetup. Happy plotting!


R-bloggers.com offers daily e-mail updates about R news and tutorials about learning R and many other topics. Click here if you're looking to post or find an R/data-science job.
Want to share your content on R-bloggers? click here if you have a blog, or here if you don't.