
Installing RStudio Shiny Server on AWS
Want to share your content on R-bloggers? click here if you have a blog, or here if you don't.
In this beginner’s level tutorial, you’ll learn how to install Shiny Server on an AWS cloud instance, and how to configure the firewall. It will take just a few minutes!
Why?
Playing around with Shiny is simple enough: all you need is is the R package called shiny, which you can get directly from CRAN.
Making your work available to you mentor is also straight forward: open an account on shinyapps.io, and deploy your application directly from RStudio.
Blogging about your Shiny app is a different story: you might have hundreds of hits in a day, and soon enough your application will hit the max hours available for free on shinyapps.io. As a result, your app will stop working.
Another situation in which you might want to deploy your own Shiny server is if you need access to a database behind a firewall (see Shiny Crud), or if you want to restrict access to your app to people within your sub net (e.g. within your intranet).
Prerequisites
This tutorial builds on the following tutorial: Setting up an AWS instance for R, RStudio, OpenCPU, or Shiny Server. So we assume that you have a working AWS EC2 Ubuntu instance with a recent version of R installed.
Also, if you are interested in Shiny in general, I recommend this introductory post.
Other References and Links
Shiny Server Open Source is free, and has extensive documentation. However, getting started is not so easy, as it is not always clear which documents apply to Shiny Server Pro (the commercial offering) or Shiny Server Open Source.
The official installation instruction from RStudio, the company behind Shiny, can be found at this link.
And here is a similar guide for digitalocean, a competitor of AWS.
Installing Shiny Server Open Source
This section is not depending on AWS. So I am assuming you have a running Ubuntu instance, and you can access it via ssh. Also, the most recent version of R needs to be installed. If any of this is not the case, see here.
Otherwise, you should see a window like this:

As a first step, we install the R Shiny package. The following command not only installs the package, but also makes sure that it is available for all users on your machine:
sudo su - -c "R -e "install.packages('shiny', repos='https://cran.rstudio.com/')""This might take a while, as all shiny dependencies are downloaded as well.
Next, you need to install Shiny server itself, by typing the following commands:
sudo apt-get install gdebi-core
wget https://download3.rstudio.org/ubuntu-12.04/x86_64/shiny-server-1.4.1.759-amd64.deb
sudo gdebi shiny-server-1.4.1.759-amd64.deb
You might want to replace the version number of the Shiny Server with the latest available release, as published here. However, leave the ubuntu version (12.04) as is.
When prompted whether you want to install the software package, press y, of course.
Your Shiny server is now installed. But before we can test it, there are two things missing:
- we need to install an app
- we need to open the port, so your Shiny server can be accessed from the outside world
Install Sample app
To install the sample app that is provided by the Shiny installer, type the following into your console:
<span class="kw">sudo</span> /opt/shiny-server/bin/deploy-example default
Again, type y if prompted.
Configuring Firewall
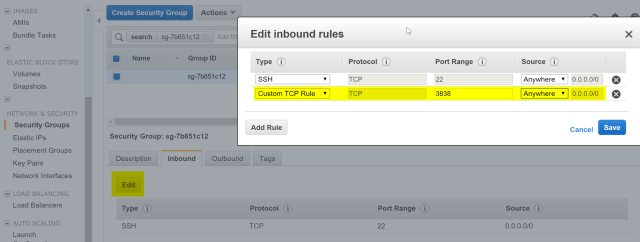
In order to be able to connect to Shiny Server, you might need to open the port on which Shiny Server listens. By default, this is port 3838.
On AWS, you can open the port by configuring the Security Group of your instance. Go to Instances, select your instance, and then click on the Security Group in the instance’s detail section:

This will bring you to the Security Groups configuration screen. Click on the Inbound tab. By default, AWS instances launched with the wizard have only port 22 open, which is needed to SSH in. No wonder we cannot access our instance!
Click on Edit and add a custom TCP rule, like so:
Open your favorite browser and enter the following address:
http://54.93.177.63:3838/sample-apps/hello/
Replace the IP address (54.93.177.63, in our example) with the public IP address of your instance, which is the same with which you connected to your instance. If everything went fine, you will see something like this:

And that’s it!
Basic Configuration and Administration
Though not the main goal of this post, let’s look at a few basic configuration options.
Start and Stop
To start and stop a Shiny Server, execute these commands:
<span class="kw">sudo</span> start shiny-server
<span class="kw">sudo</span> stop shiny-server
Configuration
Shiny Server is mainly configured via the following file:
/etc/shiny-server/shiny-server.conf
We can use the minimalistic text editor Nano to edit the configuration file. Type
sudo nano /etc/shiny-server/shiny-server.conf
You should see something like this:

For example, you could now change the port to 80, letting your users connect without specifying a port, e.g. like so:
http://54.93.177.63/sample-apps/hello/
To do that, you need to perform the following steps:
- in Nano, change the port to 80
- Save the file by hitting Ctrl+X and answering Yes
- Restarting the server by typing
<span class="kw">sudo</span> restart shiny-server
- Opening your port 80 in the AWS EC2 Security Group by adding a custom TCP rule for port 80, as described above
I hope you enjoyed this tutorial. In the next post, we’ll describe how to enable secure https connections in Shiny Server Open Source, and we’ll explain why you would want to do this.
The post Installing RStudio Shiny Server on AWS appeared first on ipub.
R-bloggers.com offers daily e-mail updates about R news and tutorials about learning R and many other topics. Click here if you're looking to post or find an R/data-science job.
Want to share your content on R-bloggers? click here if you have a blog, or here if you don't.