
Using RStudio and Git version control
Want to share your content on R-bloggers? click here if you have a blog, or here if you don't.
lIt is fairly easy to link Github or Bitbucket with RStudio, in order to enable version control, or in order to work collectively on a data project, science article, or book. It can also be used to make your data or project publicly accessible (however, there is no guarantee that it will be accessible forever, and also it doesn’t get a DOI, so e.g. OSF might be a better alternative).
Github and Bitbucket are web-based filehosts that support the version control Git. Git allows you to track changes to files, to revert files to earlier stages, and to work on files in groups. This makes it especially important for work among programmers, data analysists, and also researchers. Github and Bitbucket store all the information on different versions of your project on their server, so that others can see exactly what others on the same projects worked on, or changed.
This post will explain to you how to set up Github and Bitbucket with RStudio in order to enable version control and storage in an external repository. In nerd-speak, it explains how to “push your commits to an external repo”. Note the main differences between Github and Bitbucket relevant to this post are that the former allows you to create a public repo free of charge, while the latter allows you to create a private repo free of charge. Choose one of both platforms (or both) so that it suits your needs.
I am not going to explain how to download, install, or set up Git on your computer. I expect that you did all that and now want to link it to RStudio.
Activating Git in RStudio
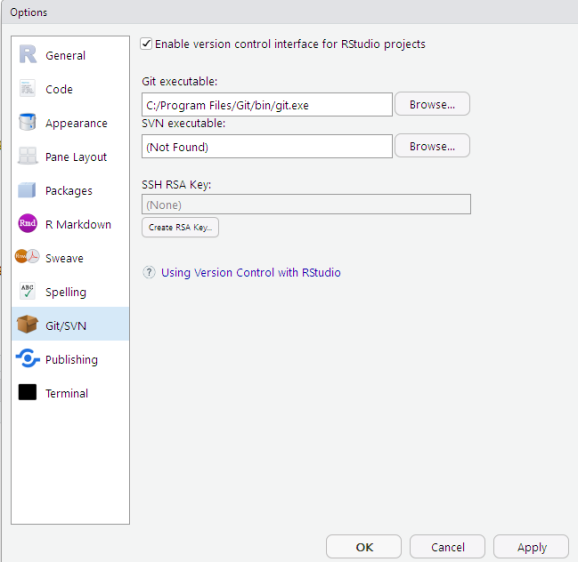
After you installed RStudio, you should enable its Git version control.
- Open RStudio
- Click Tools and navigate to Global Options
- Click Git/SVN
- Check Enable version control interface for RStudio projects
- If necessary you can also specify the path to your Git executable
An important thing which is indicated in one of the steps above is that version control via Git is linked to RStudio via projects. This means that you can only use version control if you set up a project in RStudio. If you are not in a project, the implemented Git button in the interface will not be there and you cannot use any of these features.
The following steps depend on whether you want to integrate Git with a new or an existing R Project.
Link an existing project to a new external repo
If you want to link an existing R Project to a new external repo on Github or Bitbucket, follow these steps
- Click on Tools, choose Version Control, then Project Setup
- Choose Git as the Version control system
- Answer Do you want to initialize a new git repository for this project with Yes
- You will then be asked to restart RStudio
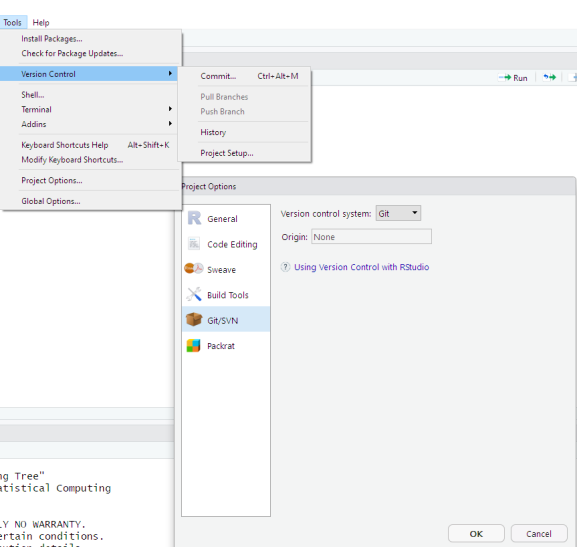
After you have restarted RStudio, you should see a Git option on the top right of the RStudio window, right next to Connections.
Instead of just enabling version control, you may still want to push to the external repo. In order to do this, you will have to create the repo on Github or Bitbucket. The name of the external repo must match the name of your project.
After you have done this, go back to RStudio and open the shell:
- Click on Git on the top right in RStudio
- Click on the cogwheel and select Shell
- Type in
git add --all to stage the changes - Type in
git commit -m 'message' to commit the changes - Type in
git push --mirror https://[email protected]/USERNAME/PROJECTNAMEto push the changes to the external repository
Step 4 may cause an error which states *** Please tell me who you are. In that case, type the following:
1. Type git config user.email "[email protected]" to indicate your Bitbucket or Github email (only for this project). If you want to specify this for all projects, use git config --global user.email "[email protected]"
2. Type git config user.name "Username" to indicate your Bitbucket or Github user name (only for this project). If you want to specify this for all projects, use git config --global user.name "Username"
To do this more conveniently in the future do the following:
- Open the Shell
- Type in
git remote add bitbucket https://[email protected]/USERNAME/PROJECTNAME
From now on, you can push to the external repo using the shell by typing git push bitbucket HEAD after having commited any changes.Note that this does not enable you to use the internal Push and Pull function provided by RStudio. In order to do this, follow the steps below:
- Push the project to the remote repository using the Shell as indicated above
- IMPORTANT: Verify that your project is in the remote repo
- Delete the local folder of your project (otherwise there will be an error message during the following steps, indicating that the folder is not empty)
- Proceed by setting up a new project in RStudio linking an existing remote repo to a new R Project via Version Control, as described in the following paragraph. RStudio will then copy the remote repo to your local repo, and you will then be able to Push and Pull from RStudio without using the shell
Link an existing remote repo to a new project
In order to link an existing external repo to a a new R Project, follow these steps:
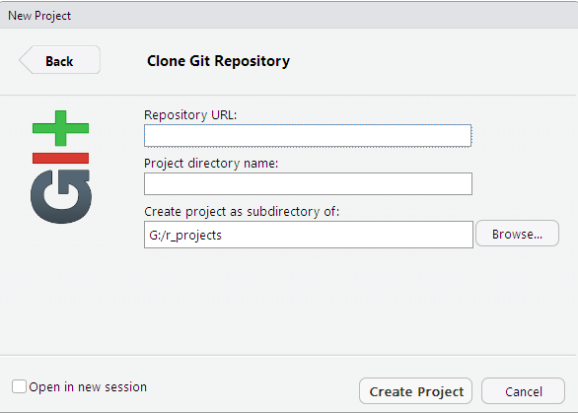
- Create a new R Project by clicking on the Project: (None) button on the top right of RStudio and select New Project…
- Select Version Control, and then Git
- There, you need to insert the Repository URL which links to the repository on Github or Bitbucket. To get that URL navigate to the respective repo and copy the link from the address bar of your browser (in Github, it will look like:
https://github.com/USERNAME/PROJECTNAME) or, for Bitbucket, go to your project overview and select the provided HTTPS or SSH link for your project ([email protected]:USERNAME/PROJETNAMEorhttps://[email protected]/USERNAME/PROJECTNAME.git), and copy them into the respective field in RStudio - Choose the Project directory name and specify the location where that project should be stored
- Click Create Project
The project should then be opened in RStudio. Click on Open existing files to see the project structure and open files which are stored in the repo.
Stage, commit, push
The following steps will explain how you can stage and commit local changes, and push these to the remote repository. If you created or edited some of your files or lines of codes, or just created some new folders in your local project, you might want to add, commit, or push these changes (you can find an explanation of the differences here).
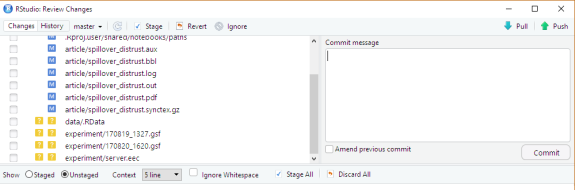
- Navigate to Git at the top right of RStudio. You will likely see some files there, something like
.gitignorewith a yellow question mark right next to it (if this is a new project). - You can stage files by ticking the box left to the file. Now, these files are staged.
- In order to commit, click Commit, and a new window will show you the changes made to the files line by line.
- Write a commit message (mandatory) indicating the changes you made, and hit Commit. These changes are now indicated in you local repo, meaning they are not visible to other people that working on the same project, and they are not safed externally.
- Click the green upward Push button to push all commited changes to the external repo
Push both to Github and Bitbucket
You may want to push both to Github and Bitbucket. In order to do so, you will have to use the shell in order to specify the remotes and in order to push the same commit to different external repos.
- Open the Shell
- Type in
git remote add bitbucket https://[email protected]/USERNAME/PROJECTNAMEand hit enter - Do the same with
git remote add github https://github.com/USERNAME/PROJECTNAME
Note that, in order to push successfully, you will have to create the remote repos manually on Bitbucket and Github, respectively.
In order to push commits to both repos, type the following in the shell after commiting your changes
git push bitbucket HEADgit push github HEAD
In order to change the name of the remote repo to which you push, use the following command in the Shell. If the current remore points to github (i.e. the origin), you can rename it to github via git remote rename origin github
Notes on workflow with RStudio and Git version control
How exactly you use Git version control in your R Project depends on the type of project you are working on, as well as on the purpose for which you are using Git. Here are two examples:
- You might be working on a data project with multiple other data scientists that all together edit the code
- You might be working on a project all by yourself but decided to use Git as a way to externally store your project and to keep track of the changes in case you want to return to a previous version of your project
It is helpful to keep a consistent folder structure in your project folders, and therefore also on your external repo. For an example, refer to this Github repo.
Possible problems
While cloning an existing repo from Bitbucket to an R Project, you may encounter the following error message Permission denied (publickey). Please make sure you have the correct access rights and the repository exists.
This error can occur if you use the SSH link provided by Bitbucket. Try using the HTTPS key, which should work. Alternatively, you can create or add your RSA key for SSH in the Git/SVN menu of the Global Options of RStudio.
This post is also published on the CorrelAid website.
R-bloggers.com offers daily e-mail updates about R news and tutorials about learning R and many other topics. Click here if you're looking to post or find an R/data-science job.
Want to share your content on R-bloggers? click here if you have a blog, or here if you don't.